Categories
Uncategorized Web Tools

How To Use Basic Google Analytics

How To Use Basic Google Analytics

By Randy Kauffman, Super Cool Sites, Inc.

 This is an article that will help business owners look at Google Analytics to determine how well their website is accomplishing the desired results.

 In this article you will discover how to analyze the most basic but important information about your website visitors and how it affects your business.

You will learn which information you should look at, and how the results can determine your new website strategy.

1. Open Google Analytics. If you have Google Analytics on your website, just go to www.google.com/analytics. Make sure you are signed into your Google account. In the header you will see a button to “Access Google Analytics”. Press that.

Access Google

You should see your company or website name as a link. Click the link.  There will be a menu on the left for viewing several different statistics about your website visitors.

The time period covered is usually the last 30 or 31 days. If you would like to change the time period just click on the dates in the upper right hand header and you can adjust them however you like.

Audience


2. Check Audience Overview. This is the first area you should see. If not, click on the “Audience Button” to expand the view.

This area gives you the basic information about how your website is doing.

Sessions – This tells you how many times your website was visited in the time period selected.

Users – This gives you the number of Unique Visitors that went to your website.  I like to divide the number of unique visitors by the number of days in the selected period to determine how many visitors per day you are getting.  This information is valuable once the value per visitor is determined.  For instructions on determining the value of one website visitor – click here.

Bounce Rate – This is a very important percentage.   A bounce is someone who comes to your site and leaves without going to any other page or interacting with your site in any way.  A high bounce rate (50% or more) means that your Home Page needs to relay better information about what the visitors are looking for.

To Reduce Your Bounce Rate
– Make Sure Your Home Page Answers These 3 Questions:

  • What is it?
  • What or Who is it about?
  • What do I get?

If these question cannot be answered immediately, you will lose a high percentage of people.

Mobile Overview – This area is important because it tells you how many people are looking at your website from a mobile device.  Make sure your website is mobile friendly to keep these visitors from bouncing, thereby helping your website convert at a higher percentage.

Mobile
Acquisition


3.  Check Acquisition Overview
This area will tell you where your visitors are coming from.

The most common areas visitors come from are:

  • Organic Search
  • Direct
  • Paid Search
  • Referral

Organic Search – These are people who find you using keywords or phrases from the search engines.  The more of these the better – it’s like free advertising.

Direct – These people went directly to your site, usually by putting your URL directly into the browser.  That means they already knew where you were.  A lot of these are returning visitors.

Paid Search – These are people that are finding your site via paid online ads like Google AdWords or Facebook Ads.  Before running any ads, you should know how much each visitor is worth to your company.

Referral – These visitors are coming from other websites that have a link to yours.  This is another great source of free visits. 

By studying the ways your website gets visitors, you can determine ways to increase traffic to your website.

Behavior

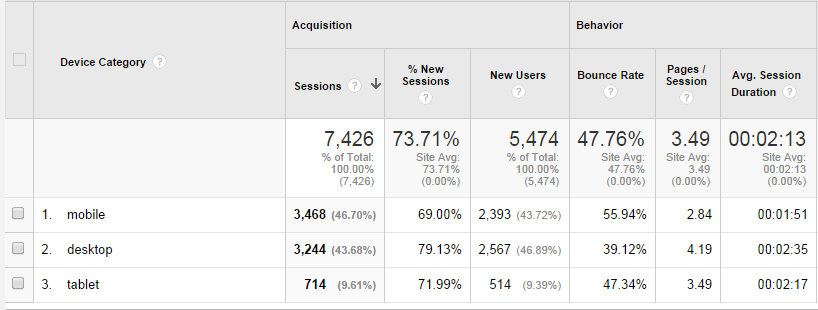
4. Check the Behavior Section – This section will tell you what visitors are doing when then are on your website and what areas they are going to the most. Under the Site Content tab, click on All Pages

Page

This will list the pages in order of popularity. Usually the Home Page is first and is designated by a backslash “/”.  The following pages are usually listed with a backslash then the name of the page, e.g.  “/contact”.  If you don’t recognize the page you will see a little double box with an arrow next to the page name. 

If you click on the double box, it will show you what the page looks like.

There is another section in behavior that I use a lot. It is a little advanced.  It’s called “In-Page Analytics”.  Here you can check where visitors click once they are on your page.   Very useful information to see what your visitors are interested in.

Conversions


5. Check the Conversions. This section might not have anything in it, but it is the most important section of all.

If you click on Conversions/Goals/Overview, you will see if any conversion goals have been set up. Here are a few common conversion goals:

  • Phone Call
  • Contact Form Use
  • Buying a product online
  • Signing up for a newsletter
  • Becoming a member of your site

If you do not have any conversion goals setup, you will see something like this:

No Conversion Goals

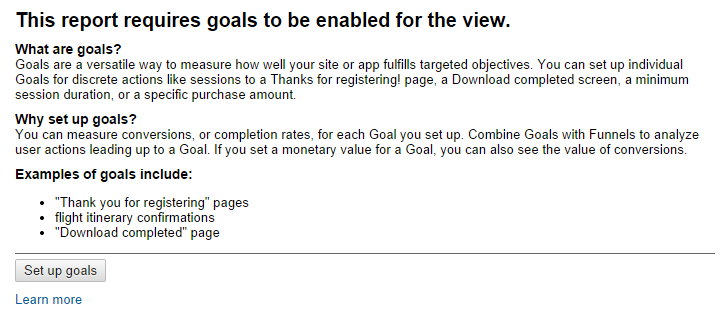
To learn how to set up goals, hit the “learn more” link.

If you have goals set up, you will see something like this:

Conversion Goals

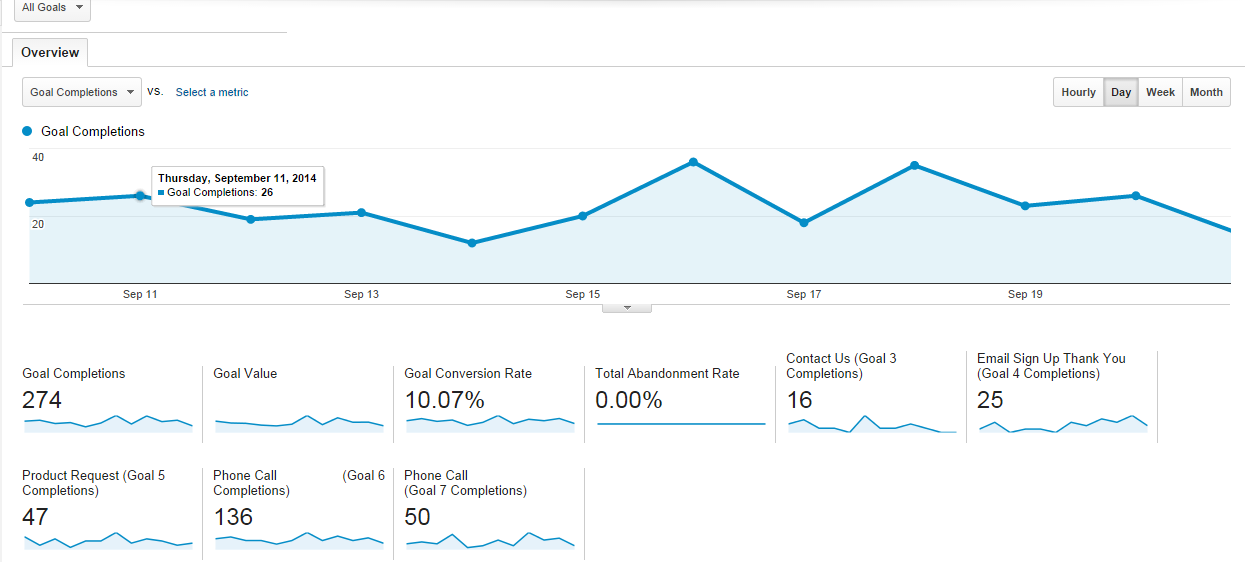
The Goal Conversion Rate in this example is 10.07%. This is the number you will want to watch and how changes in the website affect the conversion number.

For example if you changed the wording on a quote form from “Get Quote” to “Request Pricing” studies have shown that the “Request Pricing” does 20% to 50% better in getting click thru’s.

Each goal should have a value assigned to it. If you don’t know the goal value, make a good guess, then adjust the value by keeping track of conversions and what you get from each kind.

In Conclusion – Your website can be a viable part of your organization and should help contribute to the bottom line.  By utilizing Google Analytics, you can make sure you are maximizing the possibilities.

If you have any questions, you can contact me at randy@supercoolsites.com.

Sign Up

* indicates required
Categories
Web Tools

The 5 web design tools I use everyday

When it comes to building a website.  Having the right web design tools are a necessity.  There are countless ways you can do it.  You could use a free online web builder or build it in a text document like notepad.  But I’m going to give you the 5 tools that I use almost every single day and why.  I will also include a few alternatives that could save you some money.

Dreamweaver

This is one of the most popular web development programs out there.  There are plenty of others, and some are free.  But for me this has been the easiest to work with.  Most of it is pretty simple and I don’t use the graphical interface nearly as much as when I started, but it’s nice to have time to time.  But having a convenient FTP and testing program together make this a very productive tool.  Now if you don’t know html or php, this can be a bit daunting.  But most professionals use this tool.  I highly recommend getting this if you plan on building more than 1 or 2 sites.  If you are on a tight budget a very nice alternative is CoffeeCup HTML.  Right now I believe this is only $69.  Not bad for a very complete editor.

Cheaper Alternative

  1. CoffeeCup HTML (they do have a free version too)

Some Free Alternatives

  1. KompoZer
  2. Amaya

Photoshop

Again from the Adobe CC suite.  This is the most complete photo editor on the market.  You can do almost anything with this.  I would say 99% of people only scratch the surface of what it is capable of.  You can see some crazy examples of what is possible with this amazing tool on YouTube.  Check out some examples here.  Photoshop Tutorials.  This is just the free ones.

A lot of website designers use this to create the look of their website.  I mostly use it to tweak elements or photographs of people and objects to add to the web.  With adding “smart” filters and using non destructive editing means, it’s very useful to edit something.  Knowing that if you made a slight mistake, you can easily go back and fix that.  It’s also very useful in creating web friendly images (images that won’t use up all your data and time to download).

Free Alternatives

  1. GIMP
  2. Pixlr (Online Editing Tool)

WordPress

wordpressI know you might not think of this as a tool.  But for me it is exactly that.  It’s a great CMS for most businesses.  With the right combination of plugins, you can almost set up any kind of site without needing to program from scratch.  There are plenty of other Great CMS platforms out there.  But this one has had the lowest learning curve for most of my clients.  For me it has enough flexibility and power with enough ease of use that if fits into a lot of situations.  I highly recommend using this for your site.  I think the best part of it is the power of growth.  This will grow with you.

Google Chrome

Google ChromeThe main tool from Google Chrome that I use on a daily basis is the “Developer Tool”.  This helps break down each element of the site and see what is applying to it.  I can also make code tweaks that show me the live result without actually changing the code.  I can even run a test on what the site would look like on other devices.  I can also test the site speed and so much more.  I’ve used a similar tool from Firefox, but I find this one so much easier and quicker.

I know IE (Internet Explorer) still rules the internet browser war.  I do think that will continue to shift towards better platforms.  I do believe IE is starting to get better, but it’s still behind the times in my opinion.  With chrome my devices are linked and share internet information.  This has come in handy more times than I can count.  One example is looking up an address that I’m about to drive to, then forgetting the route by the time I get into the car.

Well guess what it’s already on my phone.  It remembered it from my computer.  Of course you need to be logged into Google to get these convenient links.  There is also the issue of privacy that makes a few people uncomfortable.  But for my I’m not that private of a person, or have any secrets that interesting.  So if they want to know my email, I’m ok with that.  Plus with Google Chrome comes a mass of “apps” that make it even more useful.  You can read about one of some of my favorites here (Top 5 google Chrome Apps).

I have one really big suggestion for anyone using any web browser for any reason.  Make sure it’s up to date.  If you don’t do this, trust me you are missing out.  Web standards change, websites and code changes.  If you’re using something that hasn’t been updated in the last year, you are behind.  Check out http://whatbrowser.org/ to see if your browser is up to date and what other options might suit you.

Lynda.com

OK.  So I don’t use this one on a daily basis, but at one time I did.  And I guarantee I use the knowledge I gained from this site on a daily basis.  Besides what good is a great tool if you don’t know how to use it properly.

This is one of my favorite learning tools.  You can learn almost anything from Design, Marketing, SEO, to basic time management.  This one is worth every penny plus a few extra.  I recommend getting the annual subscription.  This can help with basic site layout information to complex programming.  You can even learn how to make a phone app.  These are all video courses with Project files to help you follow the information step by step.  They recently added support for phone apps, so now I can watch any of the videos on my phone or tablet.

Runners up

There are a lot of other very valuable tools I use.  Most of them depend on what I’m doing that day.  Some of the major ones that I haven’t listed above are:

  • Google Analytics
  • Adobe Illustrator
  • My Wacom tablet
  • Coffee, lot’s of coffee

This is a very basic overview of some of the tools I use.  I plan on going into detail of how best to use some of these in the future.  If you have a preference or something your interested in, please leave a comment below.  You can also request an article with the form to the right.  I’m looking forward to this being a great resource for you and for myself.

Sign Up

* indicates required
Categories
Fun Web Tools

My top 5 Google Chrome Apps

Top 5 Google Chrome Apps

I know a lot of people use Google to do their searches. More and more people are using alternatives to Internet Explorer to surf the web (i.e. Firefox, Chrome, Safari). But do you know that you can use Google’s Chrome for so much more? You can get so many free or cheap apps. It’s like a smart phone for you computer. But even more powerful. You can use if for all kinds of things.

Here are 5 apps I use for business or I recommend them to clients that don’t have access to more expensive programs, like Photoshop.

1. Chrome Remote Desktop.

This has to be one of the handiest free tools I have ever used.  I can log into my computer from almost anywhere.  I can also set up a client so I can help them do almost anything.
https://chrome.google.com/webstore/detail/chrome-remote-desktop/gbchcmhmhahfdphkhkmpfmihenigjmpp?hl=en

2. Chrome Drive

Free storage for pics, files, whatever.  Up to 15 GB.  Nice.  I use this all the time.  Plus it’s easy to share a file with someone.

Those are the ones that I recommend that Google makes, they have a few more that are fun, but not quite making my top 5.

3. Pixlr.com/editor/

Now this technically can be used in other browsers, but with Chrome you can set it up as an app (it really just redirects you to the site, but that’s just a technicality).  But if you don’t have Photoshop or don’t feel like working in GIMP.  This is an easy to use and readily available tool.  Try it out it’s so fun.
http://pixlr.com/editor/

4. Mint

This falls into the category of the above, where it really just directs you to the site.  But this is a great free tool to help you manage all of your finances.  It will log into any account and keep everything in once place.  It can help budget, see how much your spending at Starbucks, whatever.
https://www.mint.com/t/fy14016b/

5. Google Play

Ok, back to Google.  This is where you can have all of your apps, music, videos in one place on any computer or other device that you can log into.  It’s convenient and fun.
https://play.google.com

Sign Up

* indicates required
Categories
Web Tools Weekly Tips

Google Places

Are you using Google Places or Google +? You should be. I assume you would like your business found.  I bet you would like them to visit your website.  I think you might even like them to contact you.  Maybe, buy your product or service?  Well, it all starts from finding you.  More people search online than ever before.  It’s just so easy.  “OK, Google”  Find me “……”.  “Siri” what’s the best place to shop for “….”.  You don’t even need to be at a desktop computer anymore, if you have a smartphone, it’s on you at all times.

Between your smart phone, tablet, desktop or laptop, it’s rare that you don’t have a readily available answer to the question or be able to search for the product you need.  But if you are the one selling it, could you find your product (without typing in the exact product or business name)?  If you answered no, then how is anyone else going to find you.  One of the easiest ways to get you started is something anybody can do themselves.  Add your business to Google Places. Here is the current way to do this.  It’s changing all the time so the details could be slightly different, but you should still be able to accomplish this fairly easily.  If not, don’t worry we can help.

This consists of 3 steps:

  1. Submit your information, from basic contact info to photos and video.
  2. Verify the listing by phone or postcard.
  3. Wait for the listing to appear on Google. Verification will take up to two weeks

To  Get Started: Go to http://www.google.com/business/placesforbusiness If you have an account “Sign In”  (If you don’t have an account  click “get started for free” and set up an account.)

    1. On Google Places homepage, click Add new busines
    2. On the “Find your business” tab, search for your business by phone number to see if Google already has information about your business. Select the country of your business location from the drop-down.
    3.  Enter the phone number of your business listing.
    4. Click Find business information.
    5. Review the search results, if any, to see if one of them describes your business.
    6. If none of the results are related to your business, you will be prompted to add business information on the Edit Details page.
    7. If none of the results is your business, click Add a new listing. You’ll be prompted to add more information on the next page.
    8. Fill out the basic information about your business. This includes:
    9. Company/Organization: This is the official/registered name of your business. Some businesses may be located within a mall or a container store, which is a store that contains another business. If your business is within a container store or mall, and you’d like to include this information in the local listing, specify the container store in parentheses in the business name field. For example, Starbucks (inside Safeway).
    10. Address (required): The address should look exactly the way you’d write it on a standard mailing envelope. If you are a service-area business, you’ll be able to hide your address in a few steps. We recommend listing suite numbers in Address Line 2.
    11. Phone Number (required): Be sure to include the area code with your phone number.
    12. Website: Your website URL can be a maximum of 255 characters.
    13. Click Next.You’ll now have the opportunity to provide the following information about your business:
    14. Categories: Enter several categories to describe your business, to make it easier for others to find when they search Google. Google will automatically suggest categories as you type. Make sure you choose one Google-suggested category before adding customizable categories. You can enter up to 5 categories for your business.
    15. Hours of operation: Select your hours of operation using the dropdown menus. If would prefer not to specify your hours of operation, keep the radio button selected next to “I prefer not to specify operating hours.”
    16. Payment options: Select the checkboxes next to the payment methods that your business accepts.
    17. Photos: Use the photo uploader to add a photo from your computer, or specify a URL to add a photo from the web. You can add up to 10 photos to the listing. Photos will appear in order of greatest size and quality. To learn more about adding photos, check out the User Guide.
    18. Video: To add a video, upload it to YouTube and copy and paste the URL to the listing. You can add up to 5 videos to the listing. For help with uploading your video to YouTube, read the article on how to upload a video in the YouTube Help Center.
    19. Additional details: Use this section to add custom information fields to the listing. For example, parking availability, or whether your business allows pets.
    20. You can preview the listing as it will appear in Maps on the right side of your screen. New information will appear in the preview as you enter it. When you’re satisfied with the listing, click Submit at the bottom of the page.
    21. Choose how you would like to verify your listing and click Finish.

Once you’ve submitted your business information, you’ll be asked to verify it before it goes live. There is even an Android App that helps you keep your account up to date.   CHECK IT OUT

Sign Up

* indicates required
Categories
Web Tools

Chrome Remote Desktop

Chrome Remote Desktop

  • Chrome (if you don’t have it download it) – CLICK HERE
  • Open Chrome
  • Sign into Google (if you don’t have an account you can create one HERE
  • Install Chrome Remote desktop HERE
    You will see a button on the top right that says “+ FREE”, Click That.
    You will need to approve a access and privacy issues.  If you want to use this you will need to agree

Sign Up

* indicates required